This workshop is a follow up to the Cluster Training Workshop demonstrating tools and tricks for maximizing your utilization of advanced computing resources. The workshop will provide hands-on experience with intermediate Linux commands, Linux environment settings, and bash scripting examples that will make your computational research projects more efficient, more organized, and more enjoyable.
Prerequisite: must have completed the Cluster Training Workshop or have previous experience with the Linux command line and text editing.
Change to $HOME and print working directory
[gnowmik@login1 ~]$ cd
[gnowmik@login1 ~]$ pwd
/ihome/kwong/gnowmik
[gnowmik@login1 ~]$
List content of current working directory
[gnowmik@login1 ~]$ ls
CRC  Desktop  mocvnhlysm_1N.24C_OMPI_SMP  mocvnhlysm_1titanX.1C  mocvnhlysm_1v100.1C  mocvnhlysm_2GTX1080.2C  zzz_cleanmeup
[gnowmik@login1 ~]$
Change to another directory
[gnowmik@login1 ~]$ cd mocvnhlysm_1N.24C_OMPI_SMP
[gnowmik@login1 mocvnhlysm_1N.24C_OMPI_SMP]$ pwd
/ihome/kwong/gnowmik/mocvnhlysm_1N.24C_OMPI_SMP
[gnowmik@login1 mocvnhlysm_1N.24C_OMPI_SMP]$ ls
amber.slurm  logfile  md.in  mocvnhlysm.crd  mocvnhlysm.mdcrd  mocvnhlysm.nfo  mocvnhlysm.out  mocvnhlysm.rst  mocvnhlysm.top  slurm-5105649.out
[gnowmik@login1 mocvnhlysm_1N.24C_OMPI_SMP]$
Copy a file
[gnowmik@login1 mocvnhlysm_1N.24C_OMPI_SMP]$ cp amber.slurm amber.slurm-new
[gnowmik@login1 mocvnhlysm_1N.24C_OMPI_SMP]$ ls
amber.slurm      logfile  mocvnhlysm.crd    mocvnhlysm.nfo  mocvnhlysm.rst  slurm-5105649.out
amber.slurm-new  md.in    mocvnhlysm.mdcrd  mocvnhlysm.out  mocvnhlysm.top
[gnowmik@login1 mocvnhlysm_1N.24C_OMPI_SMP]$
Rename a file
[gnowmik@login1 mocvnhlysm_1N.24C_OMPI_SMP]$ mv amber.slurm amber.slurm-old
[gnowmik@login1 mocvnhlysm_1N.24C_OMPI_SMP]$ ls
amber.slurm-new  logfile  mocvnhlysm.crd    mocvnhlysm.nfo  mocvnhlysm.rst  slurm-5105649.out
amber.slurm-old  md.in    mocvnhlysm.mdcrd  mocvnhlysm.out  mocvnhlysm.top
[gnowmik@login1 mocvnhlysm_1N.24C_OMPI_SMP]$
Delete a file
[gnowmik@login1 mocvnhlysm_1N.24C_OMPI_SMP]$ rm amber.slurm-new
[gnowmik@login1 mocvnhlysm_1N.24C_OMPI_SMP]$ ls
amber.slurm-old  logfile  md.in  mocvnhlysm.crd  mocvnhlysm.mdcrd  mocvnhlysm.nfo  mocvnhlysm.out  mocvnhlysm.rst  mocvnhlysm.top  slurm-5105649.out
[gnowmik@login1 mocvnhlysm_1N.24C_OMPI_SMP]$ mv amber.slurm-old  amber.slurm
[gnowmik@login1 mocvnhlysm_1N.24C_OMPI_SMP]$ ls
amber.slurm  logfile  md.in  mocvnhlysm.crd  mocvnhlysm.mdcrd  mocvnhlysm.nfo  mocvnhlysm.out  mocvnhlysm.rst  mocvnhlysm.top  slurm-5105649.out
[gnowmik@login1 mocvnhlysm_1N.24C_OMPI_SMP]$
Go up one directory
[gnowmik@login1 mocvnhlysm_1N.24C_OMPI_SMP]$ pwd
/ihome/kwong/gnowmik/mocvnhlysm_1N.24C_OMPI_SMP
[gnowmik@login1 mocvnhlysm_1N.24C_OMPI_SMP]$ cd ..
[gnowmik@login1 ~]$ pwd
/ihome/kwong/gnowmik
[gnowmik@login1 ~]$
Recursively copy a directory
[gnowmik@login1 ~]$ ls
CRC  Desktop  mocvnhlysm_1N.24C_OMPI_SMP  mocvnhlysm_1titanX.1C  mocvnhlysm_1v100.1C  mocvnhlysm_2GTX1080.2C  zzz_cleanmeup
[gnowmik@login1 ~]$ cp -rp mocvnhlysm_1v100.1C mocvnhlysm_1v100.1C-COPY
[gnowmik@login1 ~]$ ls
CRC  Desktop  mocvnhlysm_1N.24C_OMPI_SMP  mocvnhlysm_1titanX.1C  mocvnhlysm_1v100.1C  mocvnhlysm_1v100.1C-COPY  mocvnhlysm_2GTX1080.2C  zzz_cleanmeup
[gnowmik@login1 ~]$
Delete a directory
[gnowmik@login1 ~]$ ls
CRC  Desktop  mocvnhlysm_1N.24C_OMPI_SMP  mocvnhlysm_1titanX.1C  mocvnhlysm_1v100.1C  mocvnhlysm_2GTX1080.2C  zzz_cleanmeup
[gnowmik@login1 ~]$ cp -rp mocvnhlysm_1v100.1C mocvnhlysm_1v100.1C-COPY
[gnowmik@login1 ~]$ ls
CRC  Desktop  mocvnhlysm_1N.24C_OMPI_SMP  mocvnhlysm_1titanX.1C  mocvnhlysm_1v100.1C  mocvnhlysm_1v100.1C-COPY  mocvnhlysm_2GTX1080.2C  zzz_cleanmeup
[gnowmik@login1 ~]$ rmdir mocvnhlysm_1v100.1C-COPY
rmdir: failed to remove ‘mocvnhlysm_1v100.1C-COPY': Directory not empty
[gnowmik@login1 ~]$ ls mocvnhlysm_1v100.1C-COPY/*
mocvnhlysm_1v100.1C-COPY/amber.slurm  mocvnhlysm_1v100.1C-COPY/mocvnhlysm.crd    mocvnhlysm_1v100.1C-COPY/mocvnhlysm.out
mocvnhlysm_1v100.1C-COPY/gpus-1.out   mocvnhlysm_1v100.1C-COPY/mocvnhlysm.mdcrd  mocvnhlysm_1v100.1C-COPY/mocvnhlysm.rst
mocvnhlysm_1v100.1C-COPY/md.in        mocvnhlysm_1v100.1C-COPY/mocvnhlysm.nfo    mocvnhlysm_1v100.1C-COPY/mocvnhlysm.top
[gnowmik@login1 ~]$ rm mocvnhlysm_1v100.1C-COPY/*
[gnowmik@login1 ~]$ rmdir mocvnhlysm_1v100.1C-COPY
[gnowmik@login1 ~]$
You can only delete empty directories. The star is a wildcard character that signifies everything.
Recursively delete a directory (this is dangerous; only use when comfortable with the Linux commandline).
[gnowmik@login1 ~]$ ls
CRC  Desktop  mocvnhlysm_1N.24C_OMPI_SMP  mocvnhlysm_1titanX.1C  mocvnhlysm_1v100.1C  mocvnhlysm_2GTX1080.2C  zzz_cleanmeup
[gnowmik@login1 ~]$ cp -rp mocvnhlysm_1v100.1C mocvnhlysm_1v100.1C-COPY
[gnowmik@login1 ~]$ ls
CRC  Desktop  mocvnhlysm_1N.24C_OMPI_SMP  mocvnhlysm_1titanX.1C  mocvnhlysm_1v100.1C  mocvnhlysm_1v100.1C-COPY  mocvnhlysm_2GTX1080.2C  zzz_cleanmeup
[gnowmik@login1 ~]$ rm -rf  mocvnhlysm_1v100.1C mocvnhlysm_1v100.1C-COPY
[gnowmik@login1 ~]$ ls
CRC  Desktop  mocvnhlysm_1N.24C_OMPI_SMP  mocvnhlysm_1titanX.1C  mocvnhlysm_2GTX1080.2C  zzz_cleanmeup
[gnowmik@login1 ~]$
First, we will set up passwordless ssh on the cluster so that we can directly ssh to assigned compute nodes for monitoring or debugging
[gnowmik@login1 ~]$ ssh-keygen -t rsa
Generating public/private rsa key pair.
Enter file in which to save the key (/ihome/kwong/gnowmik/.ssh/id_rsa):
Enter passphrase (empty for no passphrase):
Enter same passphrase again:
Your identification has been saved in /ihome/kwong/gnowmik/.ssh/id_rsa.
Your public key has been saved in /ihome/kwong/gnowmik/.ssh/id_rsa.pub.
The key fingerprint is:
SHA256:WmS8u8NqHi6Z3XgUxlz+Enlzlovi0h2MXqeKMC7UHB8 gnowmik@login1.crc.pitt.edu
The key's randomart image is:
+---[RSA 2048]----+
|                 |
|       .  .      |
|       o+o .   . |
|      .oE.+ o +  |
|     o +So * = . |
|    . ooo.+ * o  |
|   . +==.+ = +   |
|    =o++*o+ o    |
|     ==ooo..     |
+----[SHA256]-----+
[gnowmik@login1 ~]$ cat .ssh/id_rsa.pub > .ssh/authorized_keys
[gnowmik@login1 ~]$
You can add aliases (also called shortcuts) to your ~/.bashrc file using the following syntax
alias shortcut="canonical Linux command"
For example, I have the following in my ~/.bashrc file
alias src="source $HOME/.bashrc"
alias sinfo='sinfo -M mpi,gpu,smp'
alias jobs="squeue -M mpi,gpu,smp -u $USER"
alias h2p="ssh -X login1.crc.pitt.edu"
If you just added aliases to your ~/.bashrc file, you need to source it before the shortcuts come into existence
source ~/.bashrc
Your ~/.bashrc file is an initialization file that gets automatically sourced when you open a new session on the Linux server.
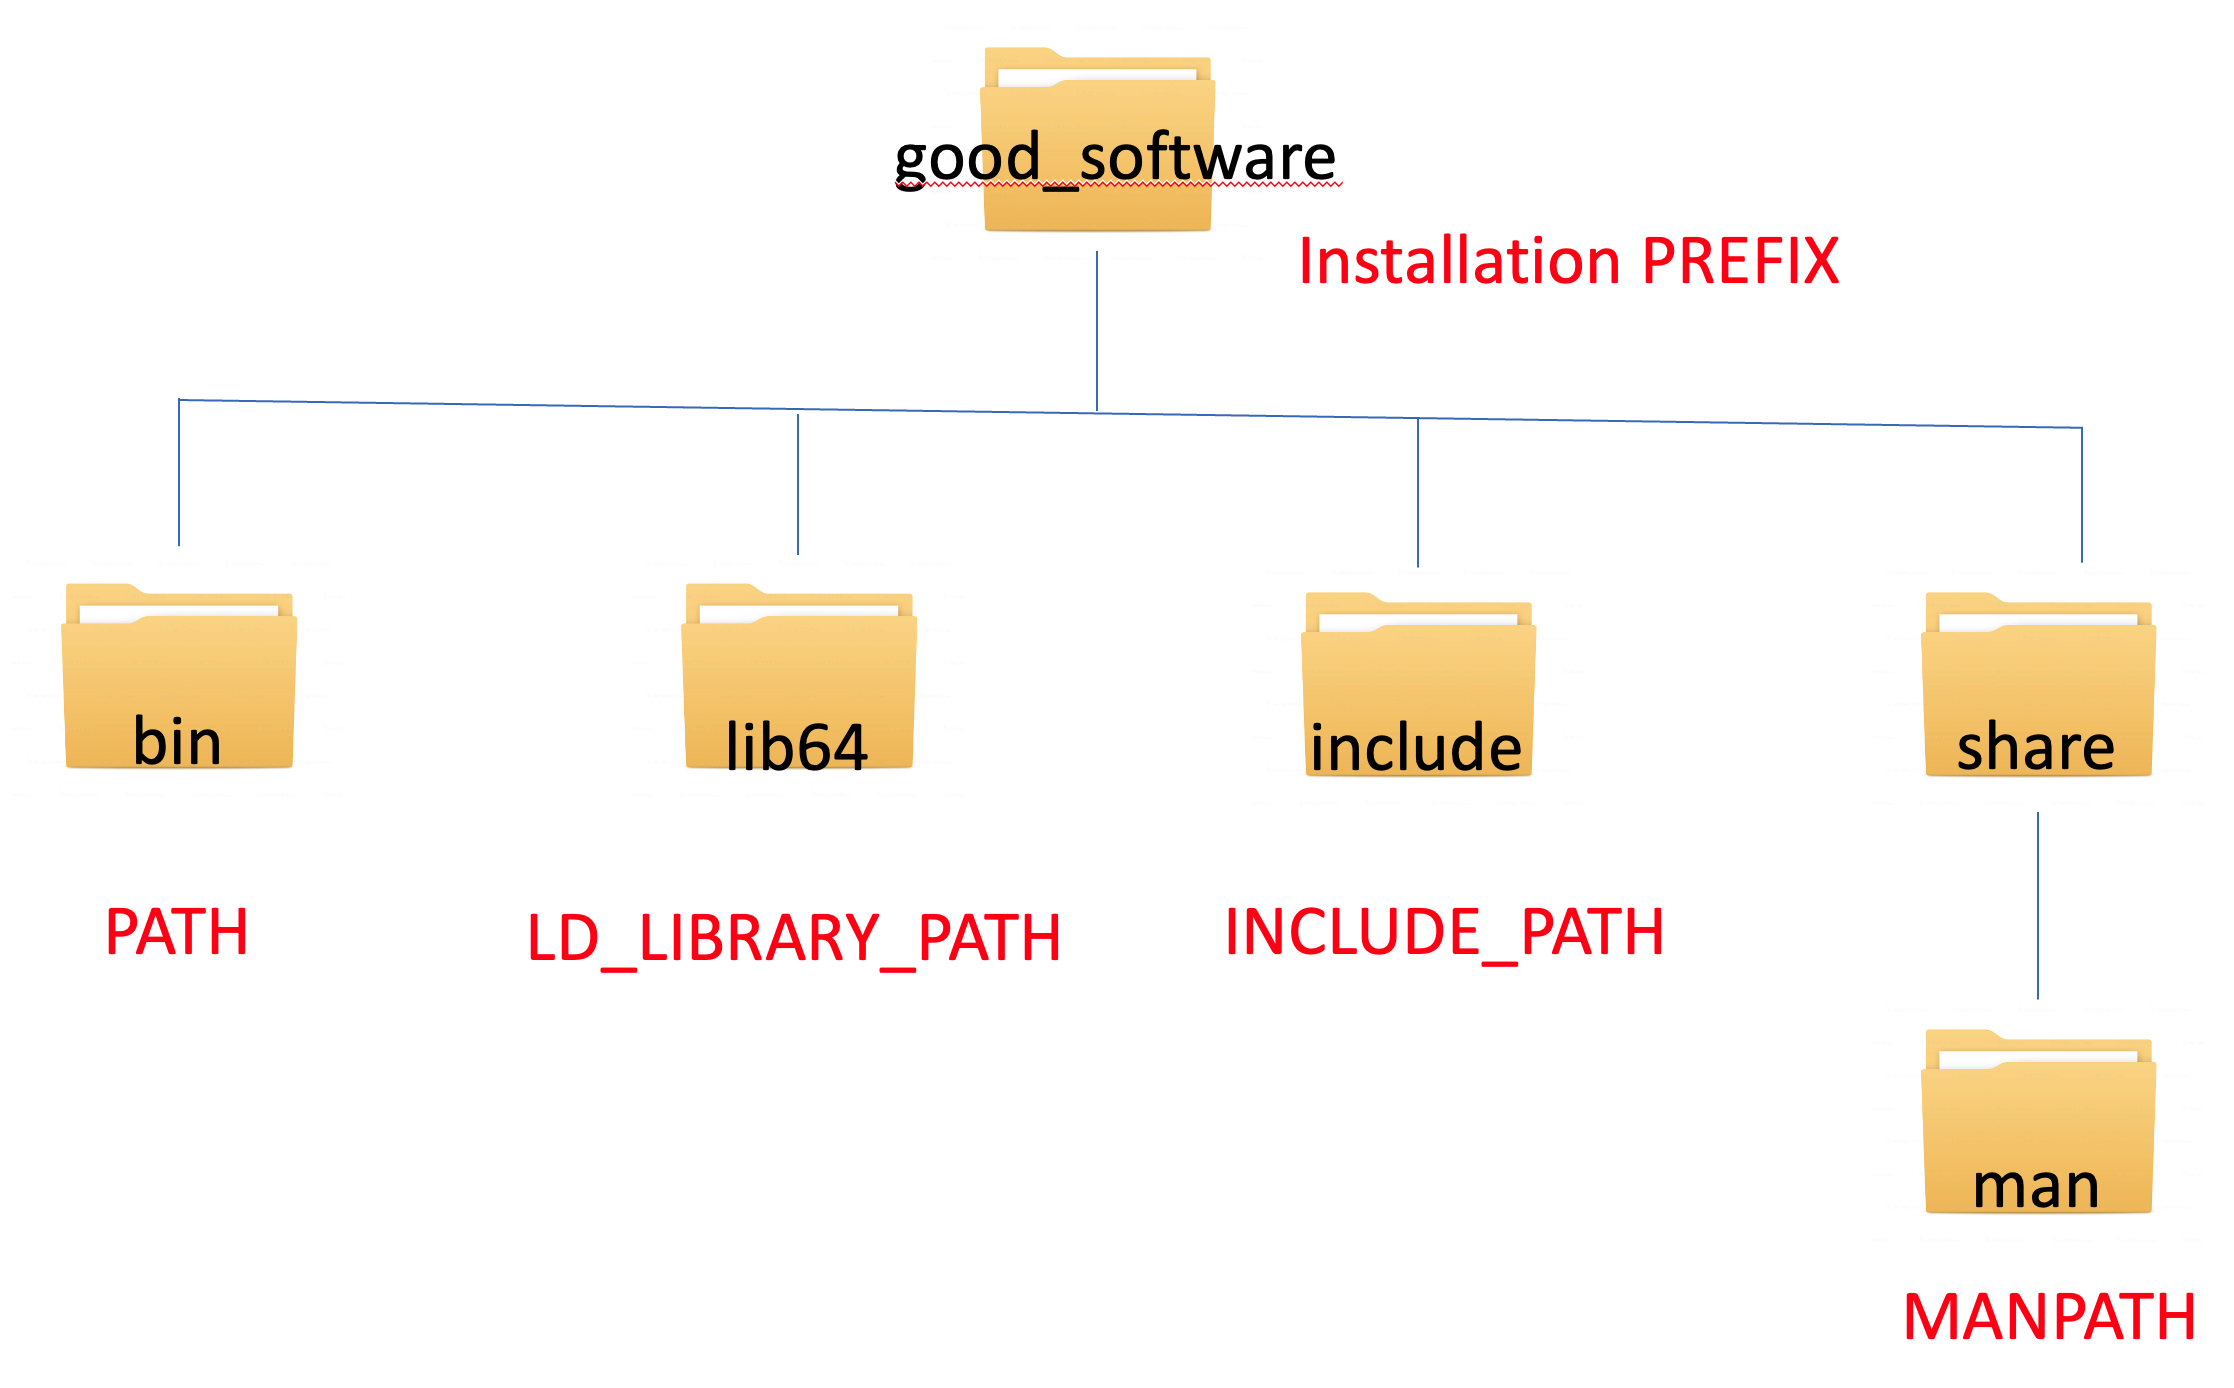
If you have done any building of software, you might have encountered the phrase add the executable to your PATHs. What exactly does that mean? Linux provides the user the flexibility to install software in any arbitrary directory path called the --prefix. If you choose to install software in a nonstandard PATH, you will need to tell the Linux OS where everything is located. This is what is meant by adding to your PATHs.
The typical PATH definitions and syntax for adding to the PATH are
- PATH –> location of executables
export PATH=~/good_software/bin:$PATH
- LD_LIBRARY_PATH –> location of libraries
export LD_LIBRARY_PATH=~/good_software/lib64:$LD_LIBRARY_PATH
- INCLUDE_PATH –> location of header files
export INCLUDE_PATH=~/good_software/include:$INCLUDE_PATH
- MANPATH –> location of manual pages
export MAN_PATH=~/good_software/share/man:$MAN_PATH
The conventional CRC wisdom for finding software is to
module spider <stuff>
followed by
module spider <specific stuff>
Then you do module load <any dependencies> followed by module load <specific stuff>. Here's an example
- Load
<stuff>
[gnowmik@login1 ~]$ module spider gcc

----------------------------------------------------------------------------------------------------------------------------------------------------------------------------------------------
  gcc:
----------------------------------------------------------------------------------------------------------------------------------------------------------------------------------------------
    Description:
      The GNU C/C++ Compiler

     Versions:
        gcc/4.4.0
        gcc/4.7.4
        gcc/4.8.5
        gcc/4.9.4
        gcc/5.4.0
        gcc/6.3.0
        gcc/7.3.0
        gcc/8.2.0
        gcc/9.2.0
        gcc/10.2.0

     Other possible modules matches:
        petsc-gcc

----------------------------------------------------------------------------------------------------------------------------------------------------------------------------------------------
  To find other possible module matches do:
      module -r spider '.*gcc.*'

----------------------------------------------------------------------------------------------------------------------------------------------------------------------------------------------
  For detailed information about a specific "gcc" module (including how to load the modules) use the module's full name.
  For example:

     $ module spider gcc/9.2.0
----------------------------------------------------------------------------------------------------------------------------------------------------------------------------------------------

[gnowmik@login1 ~]$
- Load
<specific stuff>
[gnowmik@login1 ~]$ module spider gcc/8.2.0

----------------------------------------------------------------------------------------------------------------------------------------------------------------------------------------------
  gcc: gcc/8.2.0
----------------------------------------------------------------------------------------------------------------------------------------------------------------------------------------------
    Description:
      The GNU C/C++ Compiler

     Other possible modules matches:
        petsc-gcc

    This module can be loaded directly: module load gcc/8.2.0

----------------------------------------------------------------------------------------------------------------------------------------------------------------------------------------------
  To find other possible module matches do:
      module -r spider '.*gcc/8.2.0.*'


[gnowmik@login1 ~]$
The Environment Modules work well on CRC but what exactly is lmod doing? To get an idea of what instructions lmod is executing, you can use module show <stuff>
[gnowmik@login1 ~]$ module show gcc/8.2.0
----------------------------------------------------------------------------------------------------------------------------------------------------------------------------------------------
   /ihome/crc/modules/Core/gcc/8.2.0.lua:
----------------------------------------------------------------------------------------------------------------------------------------------------------------------------------------------
prepend_path("MODULEPATH","/ihome/crc/modules/Compiler/gcc/8.2.0")
whatis("Name: gcc")
whatis("Version: 8.2.0")
whatis("Description: The GNU C/C++ Compiler")
whatis("Keywords: GNU Compiler Suite")
whatis("URL:")
whatis("-> gcc: https://gcc.gnu.org/onlinedocs/gcc-8.2.0/gcc")
whatis("-> g++: https://gcc.gnu.org/onlinedocs/gcc-8.2.0/libstdc++/manual")
whatis("-> gfortran: https://gcc.gnu.org/onlinedocs/gcc-8.2.0/gfortran")
prepend_path("GCC_ROOT","/ihome/crc/install/gcc/8.2.0")
prepend_path("PATH","/ihome/crc/install/gcc/8.2.0/bin")
prepend_path("CPATH","/ihome/crc/install/gcc/8.2.0/include")
prepend_path("INCLUDE_PATH","/ihome/crc/install/gcc/8.2.0/include")
prepend_path("LIBRARY_PATH","/ihome/crc/install/gcc/8.2.0/lib64")
prepend_path("LD_LIBRARY_PATH","/ihome/crc/install/gcc/8.2.0/lib64")
prepend_path("LD_RUN_PATH","/ihome/crc/install/gcc/8.2.0/lib64")
prepend_path("MANPATH","/ihome/crc/install/gcc/8.2.0/share/man")
prepend_path("LIBPATH","/ihome/crc/install/gcc/8.2.0/lib/gcc/x86_64-pc-linux-gnu/8.2.0")
prepend_path("LIBRARY_PATH","/ihome/crc/install/gcc/8.2.0/lib/gcc/x86_64-pc-linux-gnu/8.2.0")
prepend_path("LD_LIBRARY_PATH","/ihome/crc/install/gcc/8.2.0/lib/gcc/x86_64-pc-linux-gnu/8.2.0")

[gnowmik@login1 ~]$
Notice that lmod has variables defined for PATH, LD_LIBRARY_PATH, INCLUDE_PATH, and MAN_PATH. These are the same environment variables we discussed earlier in the How to set up PATHs section. What is happening is that the lmod configuration file for the gcc/8.2.0 package prepending the installation PREFIX directory to the PATHs. lmod is essentially updating the PATH environment variable by executing
export PATH=/ihome/crc/install/gcc/8.2.0/bin:$PATH
Conclusion: lmod is a simple-to-use utility for modifying PATHs. When you unload a pacakge wth
module unload gcc/8.2.0.
lmod returns the environment variables back to the state before the module load gcc/8.2.0 command.
To use the GNU compilers
- Load the modules by executing the following on the commandline
module purge
module load gcc/5.4.0
module load openmpi/3.0.0
- Compiler invocation
- C Compiler:
gcc - C++ Compiler: g++
- Fortran Compiler: gfortran
- Use the MPI compiler wrappers to build MPI code:
mpicc,mpicxx,mpif90
mpicc hello_world.c –o hello_world.x
To use Intel Compilers
- Load the modules by executing the following on the commandline
module purge
module load intel/2017.3.196
- Compiler invocation
- C Compiler:
icc - C++ Compiler: icpc
- Fortran Compiler: ifort
- Use the MPI compiler wrappers to build MPI code:
mpiicc,mpiicxx,mpiifort
mpiicc hello_world.c –o hello_world.x
Modifying build process through environment variables
Some package build systems conform to convention and can autodetect compilers and optimization flags based on environment settings.
#Some influential environment variables:
#  CC          C compiler command
#  CFLAGS      C compiler flags
#  LDFLAGS     linker flags, e.g. -L<lib dir> if you have libraries in a
#              nonstandard directory <lib dir>
#  LIBS        libraries to pass to the linker, e.g. -l<library>
#  CPPFLAGS    (Objective) C/C++ preprocessor flags, e.g. -I<include dir> if
#              you have headers in a nonstandard directory <include dir>
#  CPP         C preprocessor
#  CXX         C++ compiler command
#  CXXFLAGS    C++ compiler flags
#  CXXCPP      C++ preprocessor
#  CCAS        assembler compiler command (defaults to CC)
#  CCASFLAGS   assembler compiler flags (defaults to CFLAGS)
#  FC          Fortran compiler command
#  FCFLAGS     Fortran compiler flags
You use the standard syntax for setting environment variables, such as
export CC=icc
export CFLAGS= -O3 -Xhost
The best way to learn how to build packages is to look at some examples. CRC builds packages under /ihome/crc/build. We might already have a build script for your packae of interest.
[gnowmik@login1 ~]$ ls /ihome/crc/build
abaqus         comsol         g09             ipc                   macs              nodejs                power9           sprng
abinit         cp2k           gamess          itk                   magma             nvidia-hpc-sdk        proj             sra-toolkit
adf            cuba           gaussian        jaaba                 make              nv_peer_memory        prospector       stack
afni           cuda           gcc             jansson               materials_studio  nvshmem               protobuf         stata
amber          cudnn          gcmcore         java                  mathematica       octave                psi4             stringtie
amd            curl           gdma            jdftx                 matio             openbabel             pymultinest      subread
ansys          cutorch        gdrcopy         jmol                  matlab            openblas              pymvpa           suitesparse
ansysem        cweb           geos            jsilverstein          matlab-mcr        opencl                python           tensorflow
ants           damask         gibbon          julia                 matpower          opencv                python-fsps      tensorflow-1.3
armadillo      dcm2niix       git             kaldi                 maven             openfoam              python-hostlist  texlive
arpack         deeplabcut     githubcli       kallisto              medea             openmm                qat3d            tinker
ARPACK         deeptools      glew            kentutils             mesa              openmolcas            qchem            tmux
ase            deviceQuery    glib            kpp                   metis             openmpi               qt               tokyo
autodock_vina  doxygen        glibc           lammps                mgltools          orca                  quantumespresso  torch
bagpipes       dynare         gmsh            lapack                mlnx_ofed         osss-ucx              r                trilinos
basemap        eigen          go              latex                 molden            osu-micro-benchmarks  rdkit            turbomole
bash           elpa           googletest      lcov                  molecularGSM      p4vasp                regina           ucx
bats           expat          gpaw            leap                  molpro            packmol               rsem             valgrind
bazel          fastqc         gperf           libdb                 mongodb           parallel              rstudio-server   vasp
bcftools       fastx          grace           libevent              mopac             paraview              s4               vcftools
bedtools       fastx-toolkit  graphviz        libfabric             mosek             parmetis              sage             vim
berkeleygw     fdtd           gromacs         libfaketime           mpich3            parsplice             samtools         virtuoso
bison          febio          gsl             libgtextutils         mricrogl          pcre                  sas              virtuoso-opensource
blas           ffmpeg         GSM             libjpeg               mrtrix3           pcre2                 scala            visit
blender        fftw           gsmnew          libpng                multinest         pdftools              schrodinger      vlsi
boost          fhi-aims       gtk             libtiff               mumax             pedcheck              scons            vmd
bowtie2        fish           gulp            libxc                 mvapich           perl                  sdv              vscode
bzip2          flex           gurobi          libxml2               namd              petsc                 sedpy            vtk
cadence        fontconfig     hdf5            libxsmm               nano              pgi                   shcoll           westpa
cadical        fpga           hisat2          libzmq                nauty             plotjuggler           siesta           wine
caffe          fqtrim         homer           lightGBM              nccl              plumed                singularity      xfce
cantera        freefem        hpl             list_of_packages.txt  nektar++          pmix                  slurm            xilinx
cfitsio        freesurfer     hypre           lmod                  neovim            poltype               sox              xtb
charm++        fsl            imagemagick     lua                   netcdf            poppler               spark            xz
clang          fsleyes        intel           luarocks              netpbm            popt                  sparrow          zlib
cmake          fusioncatcher  intelopa-basic  lumerical             neuron            povray                spm
How do I install R packages?
First you load R and start an interactive session. You can use the same commands as you do on your own laptop to install R libraries, namely through the standard install.packages( ) syntax. The packages will automatically be installed under your $HOME.
[gnowmik@login0 ~]$ module load gcc/8.2.0
[gnowmik@login0 ~]$ module load r/3.5.2
[gnowmik@login0 ~]$ R

R version 3.5.2 (2018-12-20) -- "Eggshell Igloo"
Copyright (C) 2018 The R Foundation for Statistical Computing
Platform: x86_64-pc-linux-gnu (64-bit)

R is free software and comes with ABSOLUTELY NO WARRANTY.
You are welcome to redistribute it under certain conditions.
Type 'license()' or 'licence()' for distribution details.

  Natural language support but running in an English locale

R is a collaborative project with many contributors.
Type 'contributors()' for more information and
'citation()' on how to cite R or R packages in publications.

Type 'demo()' for some demos, 'help()' for on-line help, or
'help.start()' for an HTML browser interface to help.
Type 'q()' to quit R.

[Previously saved workspace restored]

> library(stats)
> library(EpiModel)
Error in library(EpiModel) : there is no package called ‘EpiModel'
> install.packages("EpiModel", dependencies = TRUE)
Warning in install.packages("EpiModel", dependencies = TRUE) :
  'lib = "/ihome/crc/install/gcc-8.2.0/r/3.5.2/lib64/R/library"' is not writable
Would you like to use a personal library instead? (yes/No/cancel) yes
Would you like to create a personal library
‘~/R/x86_64-pc-linux-gnu-library/3.5'
to install packages into? (yes/No/cancel) yes
--- Please select a CRAN mirror for use in this session ---
Secure CRAN mirrors

 1: 0-Cloud [https]                   2: Algeria [https]
 3: Australia (Canberra) [https]      4: Australia (Melbourne 1) [https]
How do I install Python packages?
[gnowmik@login1 ~]$ module purge
[gnowmik@login1 ~]$ module load python/anaconda3.6-5.2.0
[gnowmik@login1 ~]$ which python
/ihome/crc/install/python/anaconda3.6-5.2.0/bin/python
[gnowmik@login1 ~]$ conda create -n mypython python=3.6
Collecting package metadata: done
Solving environment: done
...
## Package Plan ##

  environment location: /ihome/kwong/gnowmik/.conda/envs/mypython

  added / updated specs:
    - python=3.6

The following NEW packages will be INSTALLED:

  ca-certificates    pkgs/main/linux-64::ca-certificates-2019.1.23-0
  certifi            pkgs/main/linux-64::certifi-2018.11.29-py36_0
  libedit            pkgs/main/linux-64::libedit-3.1.20181209-hc058e9b_0
...
  openssl            pkgs/main/linux-64::openssl-1.1.1a-h7b6447c_0
  xz                 pkgs/main/linux-64::xz-5.2.4-h14c3975_4
  zlib               pkgs/main/linux-64::zlib-1.2.11-h7b6447c_3

Proceed ([y]/n)? y

Preparing transaction: done
Verifying transaction: done
Executing transaction: done
#
# To activate this environment, use
#
#     $ conda activate mypython
#
# To deactivate an active environment, use
#
#     $ conda deactivate
[gnowmik@login1 ~]$ conda activate mypython
(mypython) [gnowmik@login1 ~]$ which python
~/.conda/envs/mypython/bin/python
(mypython) [gnowmik@login1 ~]$ conda list
# packages in environment at /ihome/kwong/gnowmik/.conda/envs/mypython:
#
# Name                    Version                   Build  Channel
ca-certificates           2019.1.23                     0
certifi                   2018.11.29               py36_0
libedit                   3.1.20181209         hc058e9b_0
libffi                    3.2.1                hd88cf55_4
libgcc-ng                 8.2.0                hdf63c60_1
libstdcxx-ng              8.2.0                hdf63c60_1
ncurses                   6.1                  he6710b0_1
openssl                   1.1.1a               h7b6447c_0
pip                       19.0.1                   py36_0

(mypython) [gnowmik@login1 ~]$ conda install numpy
Collecting package metadata: done
Solving environment: done

## Package Plan ##

  environment location: /ihome/kwong/gnowmik/.conda/envs/mypython

  added / updated specs:
    - numpy

The following NEW packages will be INSTALLED:

  blas               pkgs/main/linux-64::blas-1.0-mkl
  intel-openmp       pkgs/main/linux-64::intel-openmp-2019.1-144
  libgfortran-ng     pkgs/main/linux-64::libgfortran-ng-7.3.0-hdf63c60_0
  mkl                pkgs/main/linux-64::mkl-2019.1-144
  mkl_fft            pkgs/main/linux-64::mkl_fft-1.0.10-py36ha843d7b_0
  mkl_random         pkgs/main/linux-64::mkl_random-1.0.2-py36hd81dba3_0
  numpy              pkgs/main/linux-64::numpy-1.15.4-py36h7e9f1db_0
  numpy-base         pkgs/main/linux-64::numpy-base-1.15.4-py36hde5b4d6_0


Proceed ([y]/n)?

Preparing transaction: done
Verifying transaction: done
Executing transaction: done
(mypython) [gnowmik@login1 ~]$ conda list
# packages in environment at /ihome/kwong/gnowmik/.conda/envs/mypython:
#
# Name                    Version                   Build  Channel
blas                      1.0                         mkl
ca-certificates           2019.1.23                     0
certifi                   2018.11.29               py36_0
intel-openmp              2019.1                      144
libedit                   3.1.20181209         hc058e9b_0
libffi                    3.2.1                hd88cf55_4
libgcc-ng                 8.2.0                hdf63c60_1
libgfortran-ng            7.3.0                hdf63c60_0
libstdcxx-ng              8.2.0                hdf63c60_1
mkl                       2019.1                      144
mkl_fft                   1.0.10           py36ha843d7b_0
mkl_random                1.0.2            py36hd81dba3_0
ncurses                   6.1                  he6710b0_1
numpy                     1.15.4           py36h7e9f1db_0
numpy-base                1.15.4           py36hde5b4d6_0
openssl                   1.1.1a               h7b6447c_0
pip                       19.0.1                   py36_0
python                    3.6.8                h0371630_0
readline                  7.0                  h7b6447c_5
setuptools                40.8.0                   py36_0
sqlite                    3.26.0               h7b6447c_0
tk                        8.6.8                hbc83047_0
wheel                     0.32.3                   py36_0
xz                        5.2.4                h14c3975_4
zlib                      1.2.11               h7b6447c_3
(mypython) [gnowmik@login1 ~]$ conda deactivate
[gnowmik@login1 ~]$
This is the syntax for the for loop construct in bash
[gnowmik@login1 ~]$ for i in `seq 1 2 10`; do echo $i; done
1
3
5
7
9
An example where I use the bash for loop in my research
#!/bin/bash

HERE=`pwd`

ZZZ=( \
      HOAG_0.00_2016-SHIELD.DECOL-LESLIE_CRE-fLTAC_CP-ALLH \
      HOAG_0.00_2016-SHIELD.DECOL-LESLIE_CRE_ALL-HOSP-fLTAC_CP-ALLH \
      HOAG_0.00_2016-SHIELD.DECOL-LESLIE_CRE_HOSP-ONLY-fLTAC_CP-ALLH \
      HOAG_0.00_2016-SHIELD.DECOL-LESLIE_CRE_NH-ONLY-fLTAC_CP-ALLH \
    )

FILES1=( SHIELD-CP_days_traj_HOSP.xls \
         SHIELD-CP_days_traj_NH.xls \
         SHIELD-CP_days_traj_ICU.xls \
         SHIELD-CP_days_traj_COUNTY-AVRG.xls )

BASE_DIR=ZZZ_FOR_SARAH-2

mkdir -p $HERE/ZZZ_SUMMARY.CP-Days
cd $HERE/ZZZ_SUMMARY.CP-Days

for z in "${ZZZ[@]}"
do

   for x in "${FILES1[@]}"
   do
      ln -sf $HERE/d$z/$BASE_DIR/v$x $z"_"v$x
   done

done
This is the syntax for the while loop construct
#!/bin/bash
COUNTER=0
while [  $COUNTER -lt 10 ]; do
   echo The counter is $COUNTER
   COUNTER=$(($COUNTER+1))
done
An example from my own research
#!/bin/bash
HOSP=( AGEN AMMC CHAP CHOC CMIS COAS COLL FVRH GGMC HBHO \
       WMCA WMCS )
MEND=$(echo "scale=0;( $EPREV - $BPREV ) / $PREV_STEP" | bc)
N=0
NEND=${#HOSP[@]}

while [ $N -lt $NEND ]; do

   PPREV=$(echo "scale=2; $BPREV - $PREV_STEP " | bc | awk '{printf "%.2f", $0}')
   M=0
   while [ $M -le $MEND ]; do
      PREV=$(echo "scale=2; $PPREV + $PREV_STEP " | bc | awk '{printf "%.2f", $0}')
      sed -e "s/HOSP_NAME/${HOSP[$N]}/g"           $INP_TMPL             > $INP_TMPL.${HOSP[$N]}
      sed -e "s/PREV_VAL/$PREV/g"                  $INP_TMPL.${HOSP[$N]} > $INP_TMPL.${HOSP[$N]}_$PREV

      mkdir -p $RESULTS/${HOSP[$N]}_$PREV$TAG"_SET-"$k
      cd $RESULTS/${HOSP[$N]}_$PREV$TAG"_SET-"$k
      mv ../../$INP_TMPL.${HOSP[$N]}_$PREV MRSA.INPUT
      cp ../../$TALI_ICU .
      cp ../../../../build_$BUILD_TYPE/$EXE .

      mpirun -n $SLURM_NTASKS ./$EXE >& mrsa.log_mpi

      cd $WORKDIR/$RESULTS/${HOSP[$N]}_$PREV$TAG"_SET-"$k
      cd ../../

      M=$(( $M + 1 ))
      PPREV=$PREV
   done

   N=$(( $N + 1 ))

done
In the above script, what exactly is the following line doing?
sed -e "s/HOSP_NAME/${HOSP[$N]}/g" $INP_TMPL > $INP_TMPL.${HOSP[$N]}
sed is a stream editor for filtering and transforming text. The above line searches for a string and replaces it with another string. This command is useful for creating a generic input template and creating specific inputs files from that. Here is a better usage of sed, which performs the search/replace inplace instead of creating temporary files
sed -i'' s/replace_text/with_this/g input_template.txt
Syntax for simple arithmatic
M=0
   while [ $M -le $MEND ]; do
      ...
      M=$(( $M + 1 ))
done
Syntax for variable assignment
HOSP=( AGEN AMMC CHAP CHOC CMIS COAS COLL FVRH GGMC HBHO \
       WMCA WMCS )

N=0
What is meant by ${#HOSP[@]}?
NEND=${#HOSP[@]}
What is meant by ${ZZZ[@]}?
for z in "${ZZZ[@]}"
do
   ...
done
We have encounter the bash for loop construct before. This syntax refers to the array elements within the variable HOSP.
Syntax for arithmatic relational operators
   -lt (<)            : less than
   -gt (>)            : greater than
   -le (<=)           : less than or equal to
   -ge (>=)           : greater than or equal to
   -eq (==)           : equal to
   -ne (!=)           : not equal to
Syntax for arithmatic operators
	 +            : add
	 -            : subtract
	 *            : multiply
	 /            : divide
 	 %            : remainder
Syntax for an if conditional statement (rarely used in my research)
#!/bin/bash
if [ "bar" = "bar" ]; then
   echo bar is bar
fi
Syntax for an if-else conditional statement
#!/bin/bash
if [ "foo" = "bar" ]; then
   echo foo equals to bar
else
   echo foo is not equal to bar
fi
Syntax for an if-else if conditional statement
#!/bin/bash
# This script will test if we're in a leap year or not.

year=`date +%Y`

if [ $[$year % 400] -eq "0" ]; then
   echo "This is a leap year.  February has 29 days."
elif [ $[$year % 4] -eq 0 ]; then
   if [ $[$year % 100] -ne 0 ]; then
      echo "This is a leap year, February has 29 days."
   else
      echo "This is not a leap year.  February has 28 days."
   fi
else
   echo "This is not a leap year.  February has 28 days."
fi
- Main Documentation
https://crc.pitt.edu/resources/h2p-user-guide
- Requesting help via online ticketing system (need to log in using Pitt credentials)